
New Year and Drywall Almost Done


We finished off 2021 with a flurry of work. We took a ten day holiday vacation to work harder on the house. Our goal was to get all the drywall hung and taped with the first coat of joint compound. We almost made it.


The missing pieces of sheet rock in this photo are the only ones left. We still have a bit more to tape as well but many other areas are completely done. We even convinced the kids to do some painting.


They did a pretty good job with the primer but there was some coloring outside of the lines. They at least kept the extra coloring confined to each other. Only some clothing was sacrificed during their "paint fight". 

It was a long ten days of repetitive motion inducing soreness but it is amazing to have almost finished interior walls. When I start to complain about my sore arms and hands I just have to remind myself that at least we are indoors and we are not using shovels. All tasks pale in comparison to hand digging trenches or....

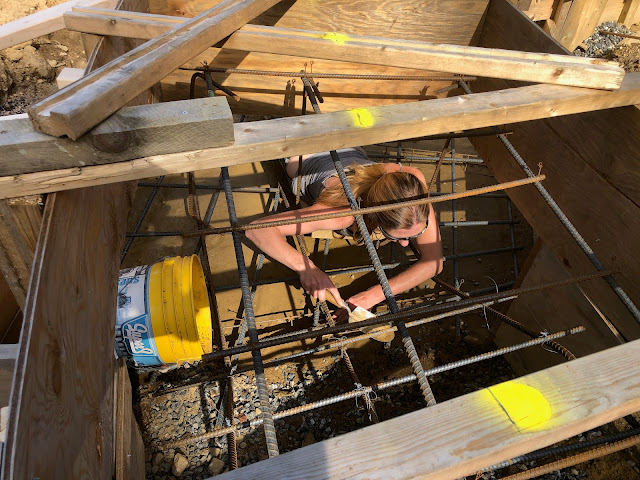
.....that super fun time when we were building the footer. I had to belly crawl along through the rebar (in 90 degree weather) to remove all the squishy silt that washed in during a summer storm using a tiny garden shovel. Fun times...Fun times...

I will take almost any job over one that uses any type of hand digging tool.


We still have the two curved walls to complete. They will be skinned with plywood instead of sheetrock. As for the next step after painting. We are not quite sure because it will depend on how quickly supplies arrive. We need to get the heat ready to go and get the water tank transferred over from the heated room in the barn to the utility room in the house. We have been heating the house with a small oil filled radiator style space heater. (you can see it in the photo above) While we wait for supplies we will most likely start setting up the kitchen cabinets. We are getting to the point in the build where we start installing finish type things. Our focus will be on the kitchen and one bathroom so we can meet the basic requirements of a CO. The goal is to move in as soon as possible and finish the house while we live there. 


Comments

Popular posts from this blog

Construction Video and Geodesic vs. Monolithic Domes

While we wait as patiently as possible for spring to dig holes for our new perc tests my posts will be directed towards general dome related things. Most people I talk to know what a dome home is but are clueless about the different types of domes. This post is to help show the differences between geodesic and monolithic domes with a few pictures of each. The saying "a picture is worth a thousand words" is true and a video must be worth 100000 words. (Watch a video of a monolithic dome being constructed at the end of this post to really wrap your mind around the process.) Many people have asked me how a monolithic dome is different than a geodesic dome. The answer can be quite simple. A monolithic dome structure is all one piece and geodesic domes are made up of many pieces (triangles) connected together. Monolithic domes are sprayed concrete like some inground pools. Here are some photos of interior and exterior monolithic domes. Compare the above Mon

Radiant Heat and Drywall DONE!

  We are DONE with dry wall and everything is painted!!! It looks almost like a real house inside. I can top that news by saying WE HAVE HEAT!!! Lets take a moment to celebrate having a functioning heating system in a cold climate in the middle of winter! The marathon of drywall is done for now. We still have the master wing of the house to do after we move in but we would like to just pretend we are done for awhile. It was a long slow dusty process but it looks amazing. The flat walls are a cool white and the dome surface is a warm cream. All our color will come from materials not paint colors. We have plans for wood, metal and stone throughout the house. We are finally getting to install more lighting fixtures and finalize all the outlets and switches. To watch a five minute video walk through CLICK HERE . Greatroom floor outlet in the center of the room. We decided that since the room is 32' across it needed an outlet in the center where furniture would be. Kids bathroom sconces

Spider Tie System Stem Wall Forms Complete

We finished building the stem wall forms last weekend! Personally I think they look super cool and I will be a bit sad to deconstruct them after we pour them. So much work to build them only to take them apart again and then just bury the whole thing underground. The original plan was to pour the stem wall on Friday October 11th but our weather was once again not cooperating. We are got yet another rain storm fueled by a storm/hurricane that thankfully mostly missed us. Because of this storm we are now scheduled to pour it on Monday October 14th. This was quite the ambitious DIY project for us. I can understand why we couldn't even get a company to put in a bid. Part of me is amazed that we pulled it off...so far. The truth will be in how it holds up to the concrete. It took almost 3000 screws to put the plywood skin on the Spider Tie towers and we cut 120 sheets of plywood! We joked that we were the Dometastic saw mill. Watch some videos of the process. It is