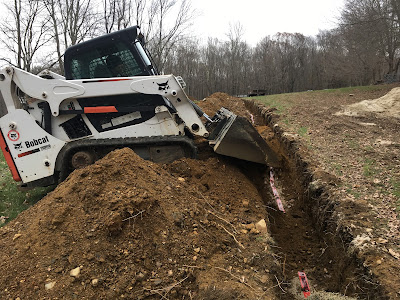
First the good news :
The power trench is inspected, back filled and ready to continue in the spring after the power company puts our pole in. The pole has been delivered and is just waiting for them to come. Our trench has 4 hay bales in the end of it so we can easily just continue digging to the pole. The concrete contractor came and did the barn foundation. Now we have a place to run power and water to in prep for building the dome.
Backfilling the trench.
The trench is all smoothed out.
Footings are poured
Finished foundation ready to do water lines, install automatic waterer and backfill.
Well... this is more of a general rant of how incompetent people are!
ACT 1: THE CEMENT TRUCK
The concrete guys built the footing forms and poured the footings BEFORE we filled in the power trench. They were well aware of what the LONG swath of disturbed dirt was from. It was a 4 FOOT DEEP TRENCH and is now filled with dirt that needs to compact over time. This is clearly not the best place to drive up the property to reach the foundation a day after it was raining. They know this and drove their vehicles up THE DRIVEWAY. Did they tell the guy driving the full cement truck? NOPE! The night before all this I told Mr. Dometastic it might be a problem because it does look a bit like a dirt driveway. He didn't think it would be a problem since they have a whole hay field to choose from and the end of the trench closest to the entry is marked with buckets. The buckets prevent you from driving straight up the line that was a trench. Then there are the guys that know that it was a trench 2 days earlier and can still see the conduit sticking out into the foundation hole. I put several yellow and white buckets over the hay bale filled end of the trench just so some idiot wouldn't drive over it! By now I am sure you know were this story is going....... YEP they tried to drive a cement truck weighing approximately 70,000 lbs ( that is the correct number of zeros) up the newly back filled power trench as if it was a driveway. SURPRISE! The back end sunk axle (or more) deep in the soft dirt. I got a frantic call from the foundation contractor about the stuck cement truck. They wanted to know if Mr. Dometastic could come lift the truck out of the hole with the excavator. Ummmmmm..... maybe..... if it decides to play today. I explained that due to its age it is a bit unpredictable but we could try. 40 yr old excavator hobbling to the rescue! It started right up after sitting for the last 4 months and pushed/lifted the cement truck back on to firmer soil. I sadly missed the action and don't have any video or photos.
It is hard to tell in the photos how deep the ruts are but they would swallow a small child.
Do you think they could have driven any closer to my buckets that are all alone in a big field? I will be connecting them with caution tape to make it even more obvious it should be avoided. Clearly buckets with rocks on top are not enough of a warning.
ACT 2: THE BARN FOUNDATION CONTRACTOR
I got my first taste of contractors not taking me seriously and completely ignoring me. I knew it was going to happen but hoped it wouldn't happen right out of the gate. I gave them a full set of plans and explained that there were a few unusual things we were doing. We went over everything verbally pointing things out on the plans. We very clearly discussed how much rebar was needed for a taller than normal back wall to the barn. The plans include a floor plan that clearly marks the doors (with sizing), where the utilities and water will be. We verbally discussed how the one interior wall would not connect to the perimeter on to allow us to install a cement culvert up on its end vertically. OK.... now I will list the errors that happened.
- They somehow missed that we were doing interior walls so gave us a quote that didn't account for them. We found out after we excavated and they were confused by the hole. (quote was given after looking at the plans and long detailed discussion)
- They connected the one inner wall footing to the perimeter. This means we won't be installing the vertical culvert to dirt like it is supposed to be installed for the automatic livestock waterer. Hope we don't have a frost issue in the future!
- They almost connected the stem wall to the perimeter wall as well but Mr. Dometastic was there (see ACT 1) to stop them.
- Mr. Dometastic was there when they were pouring the walls (see ACT 1) and didn't see the rebar we discussed but they insist that it is in the wall.
- They forgot to put in ANY of the sleeves for utilities (NOT A SINGLE ONE) and had to go in after to drill holes through the foundation.
- If Mr. Dometastic had not gone over for ACT 1 they would have made the openings for the horse stalls too small. Guys argued with Mr. Dometastic on site saying all the doors were the same size. Mr. Dometastic told them to look at the plans they had with them. OH! Oops! Almost had to break more concrete!
Ugggg! The slab for the barn storage area still needs to be poured and we have decided to do it ourselves. We will not be having him come back to finish that part. We will just wait until early spring and do it ourselves. This whole experience has pushed us over the edge in regards to hiring a foundation contractor for the dome. We have decided to do it ourselves even if it takes longer. It will not be a quick job no matter who does it. If we hire someone, they will need to buy all new materials to make custom forms just like we do. CUSTOM=EXPENSIVE We will make mistakes doing it ourselves but I am confident it won't be a list like the one above. We will also not allow a repeat of ACT 1!


oh no! you really have to be on top of them. Never assume they know what they are doing. And yes, they assume if you are a woman you don't know what you are talking about.
ReplyDeleteIt was pretty clear after the contractor was confused by the "extra walls" that he got very little out of our conversation looking at the plans. That's when Mr. Dometastic was forced into helping me communicate with the guy. This guy has been doing it for 40 years and came recommended. I think he assumed we were just an easy project he could just bang out in a day or two. He has done many barns before so he was on autopilot. He clearly didn't really look at the plans or listen to us. The more I think about it... it is good this happened on a small "non-critical" part of our build. It is an eye opener for us!
DeleteThis comment has been removed by a blog administrator.
ReplyDelete